Celebrate Independence Day With DIY 4th Of July Cards
Celebrate Independence Day with DIY 4th of July Cards
Related Articles: Celebrate Independence Day with DIY 4th of July Cards
- 4th Of July Birthday Images 2024: Celebrate With Patriotic Splendor
- Celebrating Independence And Unity: The 4th Of July In The United States In 2024
- 24th July 2007: A Pivotal Day In The History Of Global Climate Change
- 4th Of July 2024: A Day Of Celebration And Reflection
- 4th Of July Activities 2024: A Nationwide Celebration Of Independence
Introduction
With enthusiasm, let’s navigate through the intriguing topic related to Celebrate Independence Day with DIY 4th of July Cards. Let’s weave interesting information and offer fresh perspectives to the readers.
Table of Content
Video about Celebrate Independence Day with DIY 4th of July Cards
Celebrate Independence Day with DIY 4th of July Cards
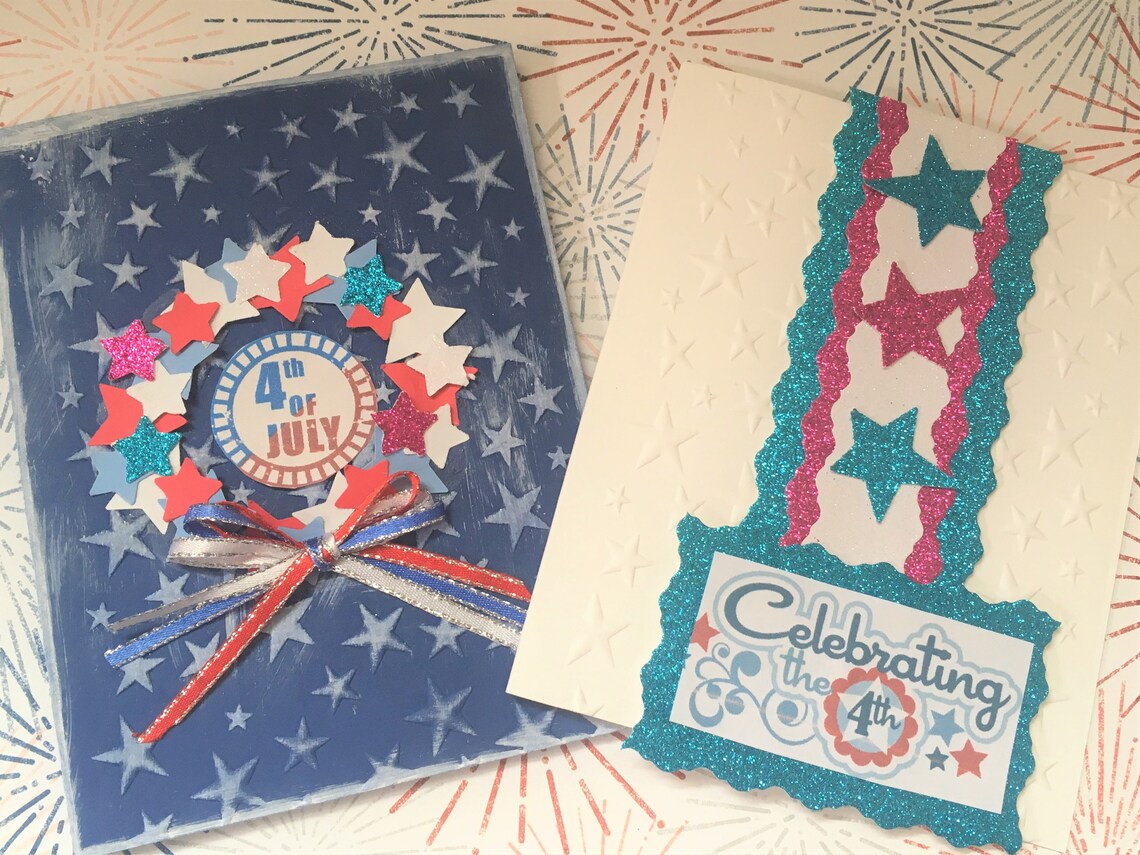
As the sun shines brightly on the 4th of July, let’s spread the patriotic spirit with handmade cards that convey our love for our nation. This year, we’re diving into the world of DIY 4th of July cards, exploring a myriad of creative ideas that will ignite your artistic side and bring joy to your loved ones.
1. Star-Spangled Banner Card
Materials:
- Red, white, and blue cardstock
- Scissors
- Glue stick
- Star stickers or cutouts
Instructions:
- Cut out a rectangle from the red cardstock, measuring approximately 5 inches by 7 inches.
- Cut out a slightly smaller rectangle from the white cardstock, measuring about 4.5 inches by 6.5 inches.
- Glue the white rectangle onto the center of the red rectangle.
- Cut out several star shapes from the blue cardstock and adhere them to the white rectangle, creating a star-spangled banner design.
2. Patriotic Pinwheel Card
Materials:
- Red, white, and blue paper
- Scissors
- Glue stick
- Toothpick
- Push pin
Instructions:
- Cut out four square pieces of paper, one in each color.
- Fold each square in half diagonally to form triangles.
- Unfold the triangles and fold them in half again, this time along the other diagonal.
- Unfold the triangles and glue the corners of each triangle together, forming a pinwheel shape.
- Insert a toothpick into the center of the pinwheel and secure it with a push pin.
- Glue the pinwheel onto a cardstock base.
3. Fireworks Extravaganza Card
Materials:
- Black cardstock
- White, red, and blue paint
- Paintbrush
- Q-tips
Instructions:
- Cut out a rectangle from the black cardstock, measuring approximately 5 inches by 7 inches.
- Dip the paintbrush into the white paint and flick it onto the black cardstock, creating a starry night effect.
- Dip the paintbrush into the red and blue paint and create streaks of color, resembling fireworks.
- Use Q-tips to dab small dots of paint, adding sparks and bursts to the fireworks display.
4. American Flag Card
Materials:
- White, red, and blue paper
- Scissors
- Glue stick
- Ruler
Instructions:
- Cut out a rectangle from the white paper, measuring approximately 5 inches by 7 inches.
- Cut out 13 strips from the red paper, each measuring about 1 inch by 3 inches.
- Cut out 7 strips from the blue paper, each measuring about 1 inch by 3 inches.
- Glue the red and blue strips onto the white rectangle, alternating the colors to create the American flag design.
- Glue a small star cut out from the blue paper onto the top left corner of the flag.
5. Patriotic Pop-Up Card
Materials:
- Red, white, and blue cardstock
- Scissors
- Glue stick
- Ruler
- Pencil
Instructions:
- Cut out a rectangle from the red cardstock, measuring approximately 5 inches by 7 inches.
- Fold the rectangle in half along the long side.
- Cut out a smaller rectangle from the white cardstock, measuring about 4 inches by 6 inches.
- Cut out a square from the blue cardstock, measuring about 3 inches by 3 inches.
- Fold the white rectangle in half along the long side and glue it to the inside of the red cardstock.
- Fold the blue square in half diagonally and glue it to the center of the white rectangle, creating a pop-up effect.
6. Patriotic Paper Plate Card
Materials:
- Paper plate
- Red, white, and blue paint
- Paintbrush
- Scissors
- Glue stick
Instructions:
- Paint the paper plate blue and let it dry.
- Cut out stars from the red and white paper and glue them onto the blue plate.
- Paint a white border around the edge of the plate.
- Glue a popsicle stick or a ribbon to the back of the plate for hanging.
7. Patriotic Origami Card
Materials:
- Red, white, and blue origami paper
- Scissors
- Glue stick
Instructions:
- Fold a square piece of origami paper in half diagonally to form a triangle.
- Unfold the triangle and fold it in half again along the other diagonal.
- Unfold the triangle and fold the bottom two corners up to meet the top point.
- Fold the left and right corners down to meet the center line.
- Fold the top point down to meet the bottom point.
- Glue the origami shape onto a cardstock base.
8. Patriotic Photo Collage Card
Materials:
- Red, white, and blue cardstock
- Photos of patriotic moments
- Scissors
- Glue stick
Instructions:
- Cut out a rectangle from the red cardstock, measuring approximately 5 inches by 7 inches.
- Cut out smaller rectangles from the white and blue cardstock to create a border around the red rectangle.
- Glue the photos onto the white and blue rectangles.
- Glue the assembled border onto the red cardstock base.
9. Patriotic Stencil Card
Materials:
- White cardstock
- Patriotic stencils (stars, stripes, eagles)
- Paint or markers
- Tape
Instructions:
- Tape the stencil onto the cardstock.
- Apply paint or markers over the stencil, creating the patriotic design.
- Remove the stencil and let the cardstock dry.
10. Patriotic Decoupage Card
Materials:
- White cardstock
- Patriotic napkins or wrapping paper
- Mod Podge
- Sponge brush
Instructions:
- Tear out a patriotic design from the napkin or wrapping paper.
- Apply a layer of Mod Podge to the cardstock.
- Place the design onto the Mod Podge and smooth it out with a sponge brush.
- Apply another layer of Mod Podge over the design and let it dry.
11. Patriotic Paper Quilling Card
Materials:
- Red, white, and blue paper strips
- Quilling tool
- Glue stick
Instructions:
- Roll the paper strips into coils using the quilling tool.
- Glue the coils together to create patriotic designs, such as stars, stripes, or eagles.
- Glue the designs onto a cardstock base.
12. Patriotic Tissue Paper Mosaic Card
Materials:
- White cardstock
- Red, white, and blue tissue paper
- Glue stick
Instructions:
- Tear the tissue paper into small pieces.
- Glue the tissue paper pieces onto the cardstock, creating a mosaic design.
- Let the cardstock dry and frame it for a patriotic display.
13. Patriotic Embroidered Card
Materials:
- White cardstock
- Red, white, and blue embroidery thread
- Embroidery needle
- Embroidery hoop
Instructions:
- Draw a patriotic design onto the cardstock.
- Insert the embroidery hoop into the cardstock and tighten the screw.
- Thread the embroidery needle and embroider the design using the patriotic colors.
- Remove the embroidery hoop and frame the cardstock for a unique and patriotic keepsake.
14. Patriotic Beaded Card
Materials:
- White cardstock
- Red, white, and blue beads
- Beading thread
- Beading needle
Instructions:
- Draw a patriotic design onto the cardstock.
- Thread the beading needle and string the beads onto the thread, following the design.
- Glue the beaded design onto the cardstock.
15. Patriotic Yarn-Wrapped Card
Materials:
- White cardstock
- Red, white, and blue yarn
- Scissors
- Glue stick
Instructions:
- Cut the yarn into short pieces.
- Glue the yarn pieces onto the cardstock, creating a patriotic design.
- Let the cardstock dry and frame it for a textured and patriotic display.
16. Patriotic Pop-Up Shadow Box Card
Materials:
- White cardstock
- Red, white, and blue paper
- Scissors
- Glue stick
- Ruler
- Pencil
Instructions:
- Cut out a rectangle from the white cardstock, measuring approximately 5 inches by 7 inches.
- Score and fold the rectangle in half along the long side.
- Cut out a smaller rectangle from the red paper, measuring about 4 inches by 6 inches.
- Cut out a square from the white paper, measuring about 3 inches by 3 inches.
- Cut out a star from the blue paper, measuring about 2 inches by 2 inches.
- Glue the red rectangle to the inside of the cardstock, centered and about 1 inch from the bottom.
- Glue the white square to the center of the red rectangle.
- Glue the star to the top of the white square.
- Fold the cardstock along the score line and decorate the front with patriotic embellishments, such as stickers or glitter.


Closure
Thus, we hope this article has provided valuable insights into Celebrate Independence Day with DIY 4th of July Cards. We thank you for taking the time to read this article. See you in our next article!